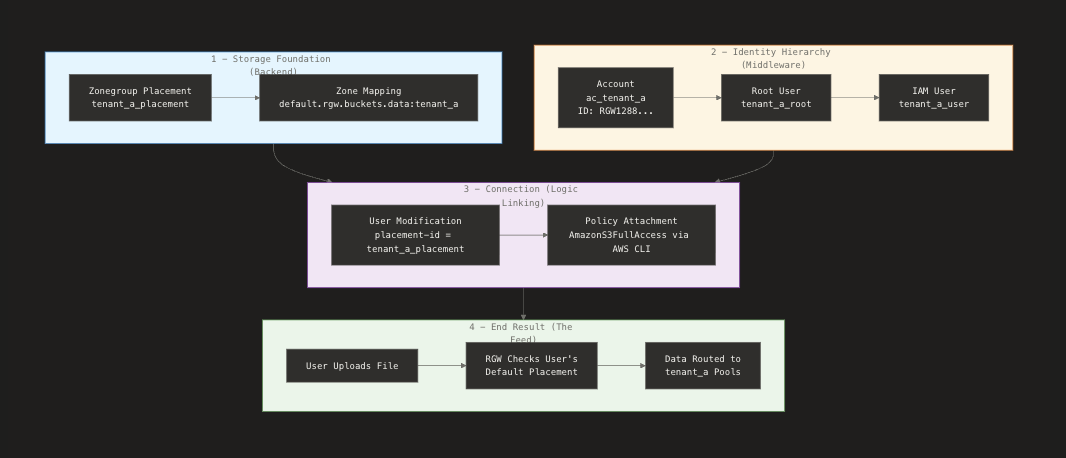
Multi-Tenant Storage Placement and IAM Account Management
Problem
By default, Rados Gateway (RGW) uses a global placement policy. In multi-tenant environments, administrators often need to: Isolate tenant data into specific physical pools (e.g., default storage backend). Manage users within an organizational container (Account) to simplify permission structures. Ensure storage is routed correctly based on the user's placement ID and tags.
Solution
Configure a custom placement ID at the zonegroup and zone levels, then associate that placement with a tenant-specific account and users.
Step 1: Storage Backend Configuration
Define the logical placement target and map it to the actual Ceph pools where data will reside.
1.1 Add Placement to Zonegroup
Define the placement ID and associated tags in the default zonegroup.
# radosgw-admin zonegroup placement add \
    --rgw-zonegroup default \
    --placement-id tenant_a_placement \
    --tags tenant_a_tag
1.2 Map Placement to Zone Pools
Map the placement ID to the specific data, index, and non-EC pools assigned to the tenant.
# radosgw-admin zone placement add \
    --rgw-zone default \
    --placement-id tenant_a_placement \
    --index-pool default.rgw.buckets.index:tenant_a \
    --data-pool default.rgw.buckets.data:tenant_a \
    --data-extra-pool default.rgw.buckets.non-ec:tenant_a
Step 2: Account and Root User Management
Create a tenant account to act as a resource container and establish a root administrator.
2.1 Create the Tenant Account
# radosgw-admin account create \
    --rgw-zone default \
    --tenant tenant_a \
    --account-name ac_tenant_a \
    --email tenant_a@tenant_a.com
Note: This generates a unique Account ID (e.g., RGW12XXXXXXXXXXXXX) required for user creation.
2.2 Create the Account Root User
# radosgw-admin user create \
    --rgw-zone default \
    --tenant tenant_a \
    --uid tenant_a_root \
    --display-name tenant_a_root \
    --account-id RGW12XXXXXXXXXXXXX \
    --account-root \
    --gen-secret --gen-access-key
2.3 Apply Storage Placement to Root User
Modify the root user to ensure all created resources use the tenant-specific storage pools.
# radosgw-admin user modify \
    --rgw-zone default \
    --tenant tenant_a \
    --uid 'tenant_a$tenant_a_root' \
    --placement-id tenant_a_placement \
    --tags tenant_a_tag
Step 3: Standard User Configuration (IAM)
Manage standard users via the IAM API using the AWS CLI. Ensure your profile is configured with the root user's credentials.
3.1 Create IAM User and Keys
# Create user
# aws --no-verify-ssl --endpoint-url "http://<endpoint>:8080" iam create-user --user-name tenant_a_user

# Generate Access/Secret keys
# aws --no-verify-ssl --endpoint-url "http://<endpoint>:8080" iam create-access-key --user-name tenant_a_user
3.2 Assign Placement Target and Policies
The standard user must be modified via radosgw-admin to inherit the placement target, then granted S3 permissions via IAM.
# Apply placement via Ceph backend
# radosgw-admin user modify \
    --tenant tenant_a \
    --uid 'tenant_a$tenant_a_user' \
    --placement-id tenant_a_placement \
    --tags tenant_a_tag

# Assign S3 permissions via AWS IAM
# aws --no-verify-ssl --endpoint-url "http://<endpoint>:8080" iam attach-user-policy \
    --user-name tenant_a_user \
    --policy-arn arn:aws:iam::aws:policy/AmazonS3FullAccess